Build Part 2
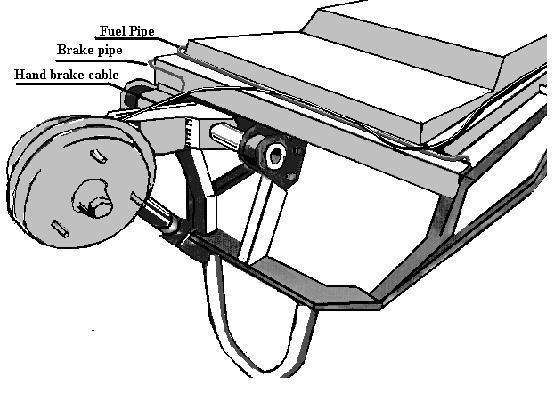
All brake components. False economy to attempt to use original metal brake piping. It will look untidy and seldom goes back in a satisfactory or safe manner. Unless hoses are very new they also will be false economy. Pads and shoes are a matter of judgement and choice.
Personally I replaced everything, including disks and cylinders, except for the disk brake callipers.
Radiator, shroud, hoses, thermostat, fan & motor (unless using replacement Honda type.).
Bonnet latch, lever and cable.(Keep the striker also to assist with making a replacement if necessary.)
Plastic mouldings that can be cut and trimmed to make scuff plates for the Spirit interior where feet frequently trample. The small plastic tray from the floor mid position, around the gear shift, comes in handy attached to the floor of the Spirit. I used the cigar lighter too as a power source for mini vacuum, emergency light etc. Any other plastic ‘pockets’ may come in handy depending upon personal choice and final cockpit space. The interior grab handles from the roof found space in my Spirit attached to the front vertical spacers as an aid to getting out of the car instead of pushing on the steering wheel. The seat belt ‘parks’ to ensure your Spirit gets through the test by having seat belts neatly hanging instead of draped on the floor.
The original radiator grill, cut and glued to fit the Spirit nose cone aperture.
Other ‘bits’ that make the job complete. The replacement steering wheel as should be supplied. Handbrake lever as advised. Honda ‘Flat triangular- motored’ fan, air filter to suit personal preference, gate hinges for bonnet (if making a tipping bonnet.) Rubber section for metal edges such as bottom wishbone front and wind deflector edge, stainless steel perforated sheet for exhaust down pipe, brackets for headlamps, waterproof material for tonneau cover and press studs.
Here I see that the next four days were spent just cleaning all the parts and painting some of the metal parts.
From there on it was stripping, cleaning and painting the engine, gear box etc. then rebuilding with new gaskets, seals, valve-grinding etc. for a further 16 days, depending on the amount of time to spare, before cleaning the garage ready for ‘The Assembly!’

The chassis was stood, inverted on two small steel beer kegs and a steel toolbox and almost all ‘underneath’ work was done in this first stage.Front suspension with torsion bars fitted, shocks, steering rack, anti-roll bar, cross tube, disk brakes with hoses.
With varied amounts of time spent on it I see that the rear suspension took some time and checking other people’s notes in the newsletters since I see that I discovered the common fault the hard way. The front edge of the swinging arm needed grinding away in a chamfer to clear the body to allow it to swing enough.
I also had great difficulty in inserting the mounting bolts to secure the arm to the new chassis, I could not get both in place.
Finally hit on the idea of inserting one and drilling the second to clear the slight error, JUST enough room to get the drill and bit in to line them up, problem solved. Carried on drilling the other holes once all was lined up.