 Part
3/3
Part
3/3
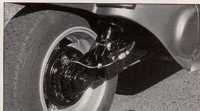
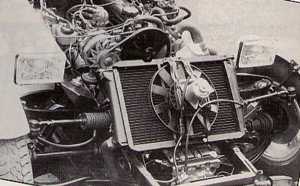
from the modified Mini exhaust is exactly the right dimension for the joins And so, with a mix of rubber~ steel, and patience, the bottom hose was thus made to duck and dive under the drive shaft After the serpentine chicanery, it then coupled capably with the radiator. After the plumbing, you then turn to electrical matters. It starts when the fan is remounted on the front of the rad rather than at the rear. Then by switching the terminals over, the fan performs a blow rather than a suck job.
Seating With an open-topped car like a Kindred Spirit, the seats represent a conspicuous part of the finished product. And so the tired and tarnished seats from the donor were sent to the skip. Only the sliding mechanisms were retained to give an adjustable driving position. At first sight, the seating posed a problem. The arrangement requires that your passenger behind needs space to place his or her legs on either side of the driver. It's a cosy arrangement. However, a passenger endowed with a generous girth around the upper thigh region needs all the space available. One way to maximize space for a passenger's legs is to fit an ultra narrow seat at the front. Hudson made one by using a Renault frame which had lost a large chunk from the middle. I didn't like the look of it and decided not to compromise driver comfort, just for those odd occasions when a passenger wants to join the fun. So I took the problem to Nottingham... to the Speedograph Richfield headquarters where I spoke to Dave Musson.
.
Bottoms are his business, and if you visit Speedograph Richfield's showroom you can perch your buttocks on a whole array of automotive seats. When we reviewed the problem, Dave established that a seat with a tipping back was needed to help a passenger climb into the back. On the other hand, to offer thigh space, you could only fit a normal driver's seat if two special indents were made in either side of the back. It sounded impossible, but I knew from previous kit car build-ups that any mountain can be scaled with Musson magic. Now we ought to mention that a fiberglass bucket seat is provided for the passenger as part of the kit but there's no form of headrest and this had to be made up by curving some plywood to make a support framework. Both items then needed foam and upholstery.The result - a front seat with thigh indents, reclining mechanism and a tip able back, a matching rear bucket seat, and a matching headrest. Arguably this three-part outfit ought to have been covered in one of Speedograph Richfield's leatherette materials for the days when it rains. But I prefer the feel of their fabric Overall, the results are excellent and having solved the needs of Kindred Spirit seating, Dave Musson can now make another group of kit car builders sit back in style Lastly as regards installation, you need to narrow down a sliding mechanism before fitting it underneath the Speedograph Richfield seat squab. was also fitted, though I'm currently looking for a suitable race-style harness.
Cockpit Tidying Determined to see the car through to the finish, the interior floor and sides were carpeted. A black leatherette surround was also constructed around the speedometer housing. This was then stuck on hardboard and carried along the interior at shoulder height to hide chassis members. One of the Renault door pockets came in handy as well and was mounted on the nearside; it increases total stowage capacity to include an Ordnance Survey map. Lastly one of the original inertia reel seat belts Body The five GRP panels which comprise the body are thickly laminated and accurately moulded There's a small amount of trimming needed to marry the rear section of the body to the sides, but in most respects there's far iess work needed than on many kit cars. Rather than pay a bit extra for a coloured gel coat finish, my panels came in boring grey Having wanted to try my hand with a compressor and spray gun, this seemed a good way to start. It's a definite advantage that au sections can be unbolted from the chassis framework, laid on the ground and dealt with separately. Wet and dry abrasive paper preceded the application of etching primer. This was followed by silver blue metallic paint on the front. and deep blue metallic on the rear. Lacquer comes last. Fablon from a DIY superstore was an easy answer for creating red and white bands to break up the joining point.
![]()
![]()