The
Renault 5 ‘Flair’ – ‘Spirit / Kindred Spirit conversion.

Being asked to produce a
write-up on the early stages of a Spirit building session after around three
years of actually having done it is straining the ancient cabbage that I call a
brain a bit.
But, if others have confidence in me and there is a need for something of the sort then I am happy to have a go.
From my first sitting in Roy Webb’s single-seater in his workshop to my present day explorations and shopping trips I have never felt ill at ease with the handling of this little ‘Webb’s Wonder’ and am perfectly happy to recommend it to all and sundry.
Stripping a Renault five should present no problems to anyonadvantagee with a set of spanners, a socket set, a hammer and chisel or two and an assortment of screwdrivers. A small disk cutter would be an and if you want to make disposal of the body shell easy when you have no access to hoists, cranes etc. then the hire or loan of a gas-cutting set will speed things along.
It is far easier, and safer, to strip a car in the open air and use valuable garage space to store the components as you remove them. Make sure you have somewhere away from under your feet to temporarily store the scrapped parts as you remove them. I also strongly recommend cleaning the car, especially the engine and compartment as best you can. The dividends this will pay are almost beyond price.
(And here is where the little red book has emerged into daylight once more in order to quote the sequence of events and times accurately.)
First item; Battery out. You don’t want shorts starting a fire at this stage.
A nice large, shallow container is handy to place under the engine and gearbox, when drive shafts start coming out, even small amounts of oil go a long way and you may be lying under there in it later. (It could prove useful first when removing the petrol tank which I strongly suggest should be the second thing you do (Battery 1st remember?) Siphon or pump it as empty as possible, believe me, speaking from experience there is nothing much worse than trying to remove a near full tank with no means of removing the fuel first and if there is a drain plug in the tank make full use of it.(Partially filling with water would be a wise safety measure.)
First 4 hours: began stripping interior. Keep Rubber mats, all plastic trims, seat belts and fittings, instrument panel, switches, pedals. (Of course, if any are beyond use then scrap them. Be merciless unless you need them as patterns to ensure accurate replacement later.)
Keep all screws, bolts, nuts and speed nuts (Those pressed spring steel clips that are used to fix panels etc.) so long as they are in good condition. If an important nut / bolt are rusted beyond use keep them just long enough to ensure the right size when replacing with new.
This is where empty coffee jars, instant mash tins etc. come in handy. With a row of these handy, self-tapping screws go into one, small bolts in another and so on.
SO, SO handy when it comes to rebuild time. Screws and bolts that are removed from definite items, such as around the sump, say, ought to be placed into small containers with the source named on it. It is so annoying to assemble a component with twelve bolts only to find there are thirteen holes.(Even more worrying the other way around.)
I advise using new, plated, bolts/ nuts on all exterior fittings, at least, as this has saved hours of work and cursing on subsequent necessary work. As you strip an old car, especially rear suspension, you will discover the wisdom in this.
Second day finished stripping interior and with the removal of the rear lamp lenses these and the lamp bodies could be removed. (I kept the interior lamps too and these have come in handy in the Spirit cockpit etc.)
If you really want to save yourself an undeserved amount of heartbreak come wiring time (If you are planning on using the original wiring loom) I strongly suggest that you have a roll of Scotch tape and a good pen handy. Label and mark each connection spade etc. as you remove them.
Use simple codes to save needing long strips with full details on. (Which will get torn etc.) Such as RL1, RL2 etc. on the wires and RL1, 2 etc. on the Rear Left lamp body terminals and so on.
Most of the loom can be removed in one piece (Let’s face it, Renault got it in there.) The only place I can recall any difficulty was somewhere around the rear tailgate. Which reminds me. Be very careful when removing the springs of tailgates if these are under any load when unbolting.
With the interior completely bare and the wiring loom rolled up waiting in the front well I now turned my attention to the front and engine compartment. Removed all lamps, wiring to the engine and assorted bits and pieces, washer, wiper, heater systems, steering rack (Mark any shims.)etc. In fact anything and everything in the compartment that was not actual engine and gearbox including the gear change rod. This also included the fragile pieces such as distributor cap, carburettor, manifold, radiator, alternator etc.
Removing the front portion of the wiring loom allowed its removal near enough complete for sorting out later. (If you have meticulously labelled the whole thing it is also going to be so easy to remove unwanted portions later.) Store it in a dry place, smudged labels are useless unless you already know a wire’s destination.
Third day removed the parts underneath, exhaust system, undershield, anti-roll bar etc.
Please bear with me while I give another lecture.
NEVER work under a vehicle that is supported only on a jack.
Please invest in proper axle-stands. They are cheap enough these days at any motor parts supplier such as Halfords.
(Cars supported on bricks are for thieves stealing wheels, but they never get hurt, it seems.)
The number of times I have seen, so called, ‘professional’ garage mechanics working under cars raised on one side, high in the air, by a jack alone has turned my blood cold. (I always leave in a hurry, I would not want to witness the results of a jack slipping.
If you have access to lifting tackle then you are fortunate, unbolt the suspension in the prescribed manner, remove the drive shafts, unbolt the engine and hoist it out.
If, like me, you do not have lifting gear then I suggest the method I adopted.
Fourth day;
Jack up the front, one side at a time, support on axle stand and remove the whole wheel system. Wheel, brake, shock absorber, wishbones (Mark the shims to show where they go back.), torsion bar, drive shaft. (And this is where an oil catching tray is worth its weight in gold.) A good hammer and broad-nosed punch will probably be beneficial for starting the torsion bar out of the bottom wishbone but mark its position on both with a centre punch first to give some idea of a good starting position when re-assembling.
Having completely cleared this first side of the car front lower onto the ground and repeat on the other side. Removal of the second bottom wishbone will also release the tubular crossmember under the engine. If memory serves I cut the chassis cross-member(s) from the engine compartment at this stage thus allowing the engine to be ‘rolled’ out forwards.
Day five;
I had stripped an old washing machine years ago and kept the pressed angle frame with four castors from its base as a useful tool for moving heavy objects around and this came in handy here.
With a sheet of ply across it I slid it under the engine and lowered the car until the engine was just resting on it. Unbolting the engine mounts I was able to lower the car leaving the engine on the ‘skate board’ and heave it out and straight into the garage out of the way.
(If the only form of support is a teenage son’s skateboard just don’t tell him I mentioned it.)
Day six;
Removed doors and tailgate, the last pieces of dead weight remaining above the floor level.
Jacked up the rear, one side at a time and, on the axle stands, removed everything I could of the rear wheels, brakes, shock absorbers, brake compensator etc.
With all excess weight removed I rolled the car onto one side and spent some time removing the suspension arms and torsion bars. The last items were the most difficult, probably they had never been disturbed during their working life. A larger hammer and some old Anglo-Saxon incantations seemed to solve the problems eventually.
Spent the rest of the day and some of the next cutting the body into manageable segments for heaving into the back of a neighbour’s pick-up for disposal at the nearest dump, along with the rest of the unwanted bits.
The Renault 5 had so many changes wrought upon it over the years that it is difficult to be definite about what your donor car may be equipped with. The following should be a fairly good guide as to what you are going to need to keep. (If in doubt keep it for now. It is easier to throw away than to replace if you find that you needed it all along.)
If memory serves me correctly, what you should finish up with for your Spirit are;
The chassis plate(s), (the Ministry test may still require the original details attached to the rebuild.)
The steering wheel retaining nut.(Too easy to overlook if throwing out the old steering wheel.)
All front engine compartment components with exception of washer / wiper systems, heater / air system, air filter and front lamps.
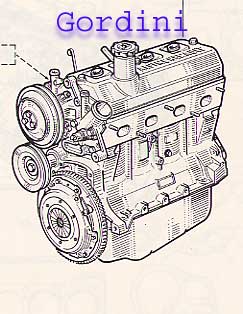
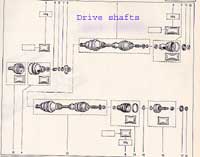
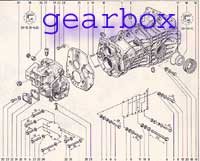
Leading items on the garage floor should include an engine and gear box, with all parts such as alternator, coil, starter, distributor and wiring, fuel pump and fuel pipework, exhaust manifold with carburettor, throttle and clutch cables with relevant levers, speedo cable, drive belts and drive shafts, any useful looking exhaust pipe.
Battery with cable / braided strap. Additional small hoses for carburettor heating are a matter of choice, mine runs perfectly happily without any of it. Use the ‘breather’ hosing for fume extraction however.
All instrument panel and switches, indicator / light switch unit, fuse panel and wiring loom.
Steering column and rack, all gear change system, seat belts with bolts and stalks, driver’s seat sliding mechanism. A front seat if you intend to modify one for Spirit use. All pedals and master cylinder.
Rear lamps including housings and number plate light, fuel tank hose, bezel and sender unit.
All front suspension including castor adjusting shims, (Mark where they came from.) shock absorbers, torsion bars, anti-roll bar and tubular cross member, wheels, wheel nuts. Rear suspension near side arm and brake compensator.